How to Label Storage Bins So You Can Find Anything Fast
Learn how to label storage bins with simple numbers, photos, locations, and searchable records so you can find items fast.
By Steve Watts · Co-Founder, Totely
May 28, 2026 · Updated June 6, 2026 · 14 min read

Storage bin labels usually make sense on packing day.
You know what you put inside. You know which bin has the Christmas lights, which one has camping gear, which one has baby clothes, and which one has the random mix of batteries, extension cords, tape, tools, garden gloves, and sprinkler parts.
Then a few months pass.
The bin moves from the closet to the garage. Someone adds wrapping supplies to the holiday bin. The camping tote loses the tent stakes but gains headlamps. The kids' clothes bin changes sizes. A moving box becomes long-term storage. The label still says "garage" or "seasonal" or "misc," but now nobody knows what is actually inside.
That is why learning how to label storage bins is not just about writing neatly on the outside.
A good label system should help you identify the bin from a distance, remember what is inside, know where the bin lives, update it when contents change, and make the whole system useful for everyone in the household.
The simplest approach is this: keep the outside label simple, then make the details searchable.
Quick Links
- Why Basic Storage Bin Labels Fail
- Step 1: Give Every Bin a Visible Number
- Step 2: Add a Short Zone Note Only If It Helps
- Step 3: Photograph the Contents Before You Close the Bin
- Step 4: Save the Exact Location
- Step 5: Keep the Details Searchable, Not Stuck on the Label
- Label Examples by Storage Type
- How to Label Already-Packed Storage Bins
- Common Storage Bin Labeling Mistakes
- How Totely Makes Storage Bin Labels Searchable
- Storage Bin Label FAQs
Why Basic Storage Bin Labels Fail
Basic storage bin labels fail because they usually try to do too much or too little.
A label that says "storage" says almost nothing. A label that says "holiday" helps a little, but it does not tell you whether the bin holds Christmas lights, wrapping supplies, ornament hooks, stockings, wreath hangers, batteries, ribbon, or gift tags.
A long label can fail too.
If the outside says "camping gear, tent stakes, headlamps, lanterns, rain ponchos, repair kit, bug spray," that works until someone moves the bug spray, adds dry bags, takes out the headlamps, or uses the tent stakes and forgets to put them back.
The more detailed the outside label is, the more likely it is to become outdated.
That is why the best label system separates two jobs:
The outside label identifies the bin. The searchable record explains what is inside.
This keeps the label easy to maintain and the contents easy to find later.
See storage tote labels that work for the same numbered-label approach on totes.
Step 1: Give Every Bin a Visible Number
Start by giving every storage bin a large, simple number.
Use numbers that are easy to see from a shelf, floor stack, closet, attic, basement, under-bed space, or storage unit.
Examples:
Bin 1 Bin 2 Bin 3 Bin 4
This may feel almost too simple, but that is exactly why it works.
A number does not become outdated when the contents change. A bin can start as holiday decorations, later hold wrapping supplies, and eventually become a seasonal decor bin. The category may shift, but the number stays the same.
That stable number gives the bin an identity.
Use a label that is large, high-contrast, and placed where you can see it without moving every container. For stacked bins, put the number on the side facing out, not only on the lid. For bins stored high, make the number large enough to read from below. For bins under a bed, put the number on the end you pull from.
The goal is not a pretty label.
The goal is a label you can actually use.
Step 2: Add a Short Zone Note Only If It Helps
A number is the most important part of the label.
A short zone note can help if you have a lot of bins.
Keep it brief. Think of the zone note as a clue, not a full inventory.
Good zone notes include:
Holiday Camping Kids' Winter Garage Quick Repair Crafts Guest Linens Sentimental Moving Box
Avoid vague labels like:
Misc Stuff Storage Random Garage Things Seasonal Things
Those labels feel easy in the moment, but they do not help much later.
A better outside label might look like:
Bin 8 Garage Quick Repair
Or:
Bin 12 Kids' Winter
Or:
Bin 3 Christmas Setup
The short note helps you get close. The number helps you connect the bin to the real contents record.
Step 3: Photograph the Contents Before You Close the Bin
Before you close the bin, take a photo of what is inside.
This is the step that makes the whole system easier.
A written label might say "holiday decorations," but a photo shows whether the bin has Christmas lights, garland, stockings, wreath hooks, replacement bulbs, gift tags, ribbon, tape, or extension cords.
A label might say "camping gear," but a photo shows whether the tent stakes, headlamps, lanterns, repair kit, dry bags, rain ponchos, and first-aid kit are actually there.
A label might say "craft supplies," but a photo shows yarn colors, vinyl rolls, paint pens, ribbon, fabric, project bags, and scissors.
Photos are especially helpful for bins with small items, mixed contents, or things another household member might describe differently.
Take the photo from above if the bin is open. If there are inner bags or pouches, take one photo of the whole bin and a second photo of the small items before you tuck them away.
This creates photo proof before digging.
Step 4: Save the Exact Location
A label tells you which bin is which.
A location tells you where to find it.
Do not stop at "garage" or "closet" if the space has more than one shelf, row, or storage area. Use exact location wording that future-you can follow quickly.
Better locations look like:
Garage shelf, top row Garage shelf, middle row, left side Hall closet, top shelf Entry closet floor Attic shelf, front right Basement shelf, second row Under bed, left side Storage unit, front shelf Craft closet, bottom shelf
This matters because bins move.
A baby clothes bin may start under the bed, move to a closet, and later go to a storage unit. A holiday bin may live in the garage one year and the attic the next. Moving boxes may begin in a spare room and end up in long-term storage.
If the location is part of the record, you can update it without changing the bin number.
That keeps the system stable even when your home changes.
Step 5: Keep the Details Searchable, Not Stuck on the Label
The outside of the bin should stay simple.
The details should live in a searchable record.
Use this format:
Outside label: Bin #
Optional zone note: Shelf, room, or storage area clue
Searchable record: Bin number: Location: Photo: Key contents: Notes:
Example:
Outside label: Bin 8
Searchable record: Bin number: 8 Location: Garage shelf, middle row Photo: Contents before closing Key contents: extension cords, batteries, tape, flashlight, work gloves, sprinkler parts Notes: Check batteries before next use
This gives you the best of both systems. The physical label is easy to read and maintain. The contents record can be as specific as needed.
Use words your household actually uses. If everyone says "Christmas lights," use that. If your family says "snow stuff," include "snow pants," "gloves," "winter hats," and "boots" too. If someone searches "bike pump" instead of "air pump," use the wording they will remember.
Searchable storage works best when it matches real language.
See how to keep track of storage bins for keeping those records current over time.
Label Examples by Storage Type
Different bins need different levels of detail.
Here are practical examples you can adapt.
Label Examples by Storage Type
Bin 1 — Christmas Setup
Christmas lights, wrapping supplies, gift tags, ribbon, tape, ornament hooks, extension cords, batteries, replacement bulbs.
Bin 2 — Camping First Open
tent stakes, headlamps, lanterns, ground tarp, rope, repair kit, rain ponchos, flashlights.
Bin 3 — Garage Quick Repair
tools, hardware, extension cords, batteries, tape, flashlight, garden gloves, sprinkler parts.
Bin 4 — Kids' Winter
baby clothes, kids' clothes, seasonal clothing, winter gear, snow pants, boots, gloves, hats.
Bin 5 — Crafts
yarn, vinyl rolls, scissors, paint pens, ribbon, craft supplies, project bags.
Bin 6 — Summer Gear
sports gear, beach gear, beach towels, swimsuits, goggles, sunscreen backup, pool toys.
Bin 7 — Keepsakes
sentimental items, family recipes, school papers, photo albums, handwritten letters, small heirlooms.
Bin 8 — Backstock
guest linens, household backstock, extra blankets, light bulbs, batteries, small appliances.
Box 9 — Kitchen Open First
mugs, coffee maker, filters, dish towels, utensils, small appliances.
Box 10 — Storage Unit Front
seasonal decor, tools, guest linens, kids' clothes, moving supplies.
The outside label gives the container a name. The searchable record gives it memory.
For deeper workflows by topic, see garage storage ideas for totes and bins, how to organize Christmas decorations in storage bins, how to organize camping gear in storage totes, and how to organize kids clothes by size in storage totes.
How to Label Already-Packed Storage Bins
You do not have to empty every bin to build a better label system.
If your bins are already packed, start with the outside.
Choose one shelf, one closet, one stack, or one storage area. Add large numbers to the bins exactly as they are.
Then open one bin at a time.
Do not reorganize everything unless you want to. Just take a photo, save the location, and record the key contents you can see.
If the bin is too packed to understand, remove the top layer, take a second photo, and add a simple note like:
Needs review before next season Mixed holiday and wrapping supplies Contains fragile ornaments Restock batteries Kids' sizes need checking Open first when moving
This gives you a useful record without turning labeling into a full cleanout.
Start with the bins that cause the most frustration: holiday decorations, camping gear, baby clothes, seasonal clothing, tools, craft supplies, or household backstock.
A better system does not need to be built all at once.
Common Storage Bin Labeling Mistakes
Most label systems break down because they make one of these mistakes.
Mistake 1: Labeling only the lid If bins are stacked, the lid may not be visible. Put the number on the side that faces out.
Mistake 2: Using labels that are too vague "Misc," "storage," "garage," and "seasonal" do not help you find exact items.
Mistake 3: Writing long item lists on the outside Detailed exterior labels become outdated when contents change.
Mistake 4: Skipping the location A perfect label does not help if you do not know whether the bin is in the attic, basement, closet, garage, under the bed, or storage unit.
Mistake 5: Relying on one person's memory A household system should work for anyone who needs to find or return an item.
Mistake 6: Forgetting to update after changes Update the photo or record when you add, remove, combine, move, or repurpose a bin.
The fix is simple: visible number outside, searchable details behind it.
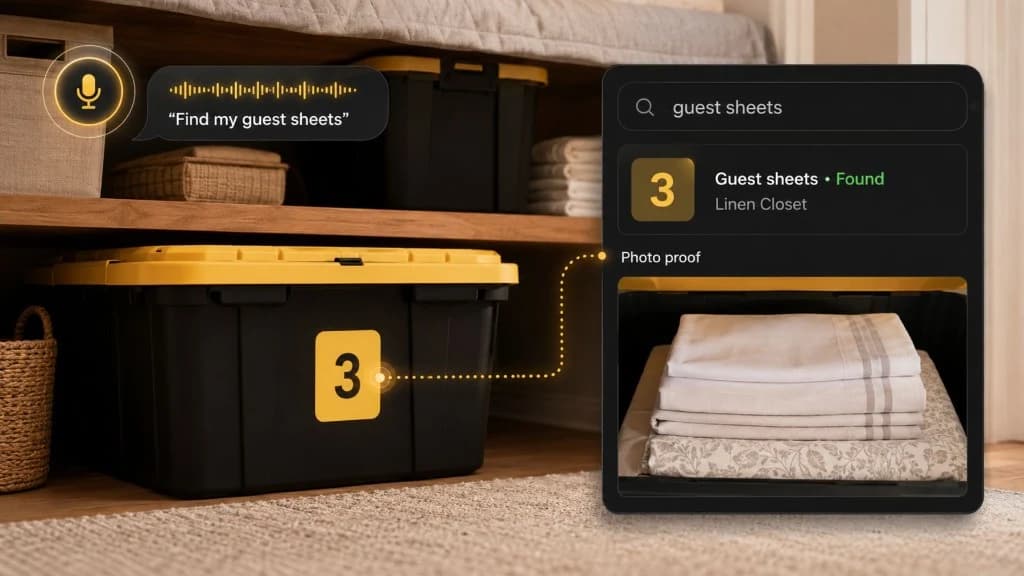
How Totely Makes Storage Bin Labels Searchable
Totely helps turn storage bin labels into something more useful than a sticker.
Instead of trying to write everything on the outside of the bin, you can keep the physical label simple and make the contents searchable.
Here is the simple flow:
Number the storage bin, tote, box, shelf, or storage zone
so it has a clear identity.
Snap a photo before closing the bin
so you have visual proof of what is inside.
Let AI build the first item list
from what it can see.
Review or edit if needed
so the words match how your household searches.
Save the exact location
such as "garage shelf top row," "hall closet," "attic shelf," "under bed left side," or "storage unit front shelf."
Add notes
like "fragile," "seasonal," "kids' winter gear," "open first," or "restock batteries."
Search naturally later
for "Christmas lights," "tent stakes," "baby clothes," "extension cords," "yarn," "garden gloves," or "guest linens."
Use photo proof
to confirm what is inside before opening every bin.
Totely does not require QR codes, barcodes, or manual entry of every item.
The key idea is simple: storage bin labels work best when the outside is simple and the details are searchable.
Try the One-Tote Test on one bin before you relabel the whole house.
A Storage Bin Labeling System You Can Copy
Use this system for garages, closets, attics, basements, under-bed storage, storage units, moving boxes, and shared household areas.
Outside Label Format
Bin 1 Optional zone note: Christmas Setup
Searchable Record Format
Bin number: 1 Location: Garage shelf, top row Photo: Contents before closing Key contents: Christmas lights, ornament hooks, extension cords, replacement bulbs, wrapping supplies Notes: Restock tape before next December
Example Labeling System
Bin 1 — Christmas Setup
Garage shelf, top row. Christmas lights, ornament hooks, extension cords, replacement bulbs, wrapping supplies.
Bin 2 — Camping First Open
Garage shelf, middle row. Tent stakes, headlamps, lanterns, ground tarp, rain ponchos, repair kit.
Bin 3 — Kids' Winter Gear
Under bed, left side. Kids' clothes, winter gear, snow pants, gloves, hats, boots.
Bin 4 — Craft Supplies
Hall closet, top shelf. Yarn, vinyl rolls, craft supplies, ribbon, scissors, project bags.
Bin 5 — Garage Quick Repair
Garage shelf, bottom row. Tools, hardware, extension cords, batteries, tape, flashlight, sprinkler parts.
Bin 6 — Keepsakes
Bedroom closet, top shelf. Sentimental items, family recipes, school papers, photo albums, small heirlooms.
Box 7 — Kitchen Open First
Storage unit, front shelf. Moving boxes, small appliances, mugs, dish towels, coffee supplies.
If you only do one bin today, that still counts.
Give it a number. Take a photo. Save the location. Make it searchable.
Storage Bin Label FAQs
What is the best way to label storage bins?
The best way to label storage bins is to use a large visible number on the outside, add a short zone note only if it helps, photograph the contents, save the exact location, and keep the details in a searchable record.
What should I write on storage bin labels?
Write the bin number first. If useful, add a short zone note like "Christmas Setup," "Camping," "Kids' Winter," "Crafts," or "Garage Quick Repair." Keep long item lists in a searchable record instead of writing everything on the outside.
Should I use numbers or written labels on storage bins?
Numbers are easier to maintain because they stay accurate even when contents change. Written labels can help as short clues, but broad labels like "misc," "garage," "seasonal," or "storage" are usually too vague on their own.
How do I label bins that are already packed?
Start by adding visible numbers to the outside of each bin. Then open one bin at a time, take a photo, record the key contents, and save the exact location. You do not have to empty every bin to make the system useful.
Do clear storage bins still need labels?
Yes. Clear bins still need labels because contents can be hard to see when bins are stacked, stored high, packed tightly, or filled with small items. A visible number and searchable record make clear bins much easier to use.
How can Totely help with storage bin labels?
Totely helps you number each bin, snap a photo, let AI build the first item list, review or edit it, save the exact location, add useful notes, and search naturally later. Photo proof helps you confirm what is inside before opening every bin.
Start With One Bin and Make It Searchable
You do not need to relabel your entire home in one afternoon.
Start with the bin that annoys you most.
Maybe it is the holiday bin, the camping tote, the baby clothes container, the craft supply bin, the garage tools box, or the moving box you keep opening and closing.
Give it a large number. Add a short zone note if helpful. Take a photo before you close it. Save the exact location. Keep the key contents searchable.
With Totely, storage bin labels become more than words on plastic.
They become a simple way to find what you already own.